Project #1: Make Your Schedule
The path to your dream home requires planning and plenty of patience, so it helps to create a realistic schedule. Set aside six months to refine your home’s design, which will be when you create your floor plans and working drawings. After that, allocate another two months for the timbers to be cut and delivered to your building site. Raising and enclosing the frame takes approximately one week. After that, depending on its size, finishing it can take two to nine months or more.
Project #2: Learning the Legalese
Next up are building permits and details. While your timber producer prepares the wood for delivery, your general contractor (GC) should use that time to obtain and pay for various clearances (including the all-important building permit) so that construction can begin on time. They should also talk to the local building authority and your lender to determine when each will require inspection of the work. To keep things on track, the GC should contact the local power company to arrange for temporary electrical service at the site. This would also be the time to schedule a crew to install the well and septic system.
Project #3: Prepwork
Now, the hands-on work begins. Several weeks before the arrival of your home’s timbers and other building components, a surveyor will come to your property, mark the boundaries of the house and indicate where the footings and foundation should be. An excavator will clear the site of trees and brush and put in a rough road so that the contractor’s equipment and deliveries can reach the building site. With temporary access in place, the subcontractors hired to dig the well and set up the septic system can start to drill, lay out a drainage field and bury the septic tank in the ground.
Project #4: Foundation Fundamentals
There are several types of foundations: poured concrete, insulated concrete forms, masonry block, pre-cast wall, concrete slab and pier. The type that’s chosen for your home is governed by several factors, including the site’s characteristics, the type of soil, the local climate, your home’s design and your budget. Your timber provider will supply the general contractor with specifications for the type of foundation your house needs.
The footings will be set first, then checked and approved by the local building inspector before the foundation walls or piers are erected. Footings are crucial because they enable the weight of the house to be distributed to the ground over a large area. In addition, they serve as a level surface on which to set the foundation walls.
Project #5: Putting the Pieces Together
Next to move-in day, the day your timber provider’s truck (or trucks) pulls up with your frame is the most momentous in any future timber homeowner’s journey. But once they arrive, what happens next?
First, the framing crew will unload it from the truck using a crane, a forklift or by hand. The crew will then inventory and organize the timbers by function — posts, beams, braces and the like — to expedite construction. Once you’re sure everything has arrived to your satisfaction, it’s important for your contractor to protect all the components. This is especially true for the frame. They should use 2-by-4s to space the stacked timbers for airflow and to help keep them dry. Exposure to any inclement weather could cause damage and delay the raising.
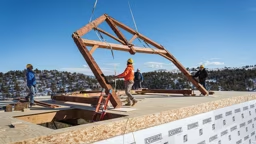
Finally, the crew will raise the frame bent by bent or section by section, depending on its overall design. Timber frames go up quickly, so there’s a satisfying measure of instant gratification at this stage in the process.
Project #6: Building on the Framework
In the weeks following the raising, the materials that will form the exterior walls and roof will be attached to the timber frame to fully enclose it. Installing structural insulated panels (SIPs) is the most frequently used method to enclose a timber home. Frequently, SIPs also are used as the basis for the roof. They’re usually nailed directly onto roof timbers, but decking may be nailed to the timbers first as a base for layers of rigid foam insulation. The roof will then be topped with any type of material you choose and work on the exterior will continue with the installation of windows and doors. Your home is now weathertight. Around the same time, the crew will paint the siding and trim, build the garage and any porches and decks the design calls for.
Project #7: Get Technical
Now that the home is fully enclosed and protected against the elements, it’s time to focus on the interior. The basic systems of the house will be put into place in this order: plumbing; heating, ventilation and air conditioning (HVAC); and electrical wiring. These systems, installed by subcontractors, are concealed within interior walls, which are constructed with conventional wood-stud or steel framing. Once you obtain the inspector’s seal of approval, the interior walls will be enclosed. Next, the flooring will be laid.
It’s now time to bring in the kitchen appliances and bath fixtures and install the cabinets and countertops. Once those are in, the plumbing, HVAC and electrical subcontractors return to hook things up. The electrician will hang light fixtures and install receptacles throughout the house. The plumber will install tubs, toilets and sinks. This is also when plumbing fixtures get connected to the main inbound and wastewater lines. Heat registers and thermostats will be hooked up, and trim carpenters will affix the doors and hardware.
Project #8: Finals
Toward the end of construction, the driveway will be poured. The excavator will return to give the site a final grade, which ensures proper drainage away from the foundation. (This step is done late in the process to give the foundation’s backfill time to settle.) The roofing contractor will install gutters and downspouts. And, finally, the landscaper will seed the yard or lay sod and plant trees and other foliage. Congratulations — you’ve almost graduated to a timber home owner.
Meet the Building Inspector
Like the professor of a class, the builder inspector holds authority during every step of your home’s construction. He or she will review your home’s design before issuing a building permit. During construction, inspectors make on-site examinations to ensure your home follows its approved design. If there are discrepancies between the plan and what’s being built, the inspector has the power to stop work until the problem is corrected. Finally, it’s the inspector who will give it a final grade and pronounce your home livable by issuing a certificate of occupancy.
See Also: 8 Steps to a Smooth Timber Home Build


